Enable Timeline in Facebook Right Now
Facebook in it F8 conference bring major changes in Facebook one of the is the Timeline in ProfileWhich shows every thing you did from the startup. It include the date of your birth too. See how it look like

How to Enable this Timeline for your Profile Right Now? Just Follow the instruction.
Step 1: After getting Login for the Facebook type "Developer" in the search box above and click on the top option (first one) or go to link.
Step 2: Allow the Developer by clicking on allow button, this will enable developer mode. Then you will be at developer apps page.

Step 3: Now in the apps page, click on 'Create New app' which would be at top right corner. Write your apps name and the name space and submit it. After submitting enter the captcha.

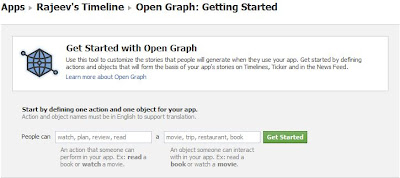
Step4: You will be Now at Apps->Your App name->Basic. If wan change do it there. Go to open 'Open Graph' and click there after saving things on the page. You will now be at 'Open Graph Getting Started' page.


Step 5: In the 'Open Graph Getting Started' Type the something like 'read a book' or 'plan a trip' or 'watch a movie'. Since it is for read purpose so better give 'read a book' or 'read opengraph'. Click on Get Started.
Step 6: In next three tabs named 1. Edit your Action Type 2 Edit your Object Type 3 Create an Aggregation just click on save button at below move next. May change something but better opt out. At last you will finish the apps creation.

And You have it. Do Put your comment below and Follow my Blog.

How to Enable this Timeline for your Profile Right Now? Just Follow the instruction.
Step 1: After getting Login for the Facebook type "Developer" in the search box above and click on the top option (first one) or go to link.
Step 2: Allow the Developer by clicking on allow button, this will enable developer mode. Then you will be at developer apps page.

Step 3: Now in the apps page, click on 'Create New app' which would be at top right corner. Write your apps name and the name space and submit it. After submitting enter the captcha.

Step4: You will be Now at Apps->Your App name->Basic. If wan change do it there. Go to open 'Open Graph' and click there after saving things on the page. You will now be at 'Open Graph Getting Started' page.

Step 5: In the 'Open Graph Getting Started' Type the something like 'read a book' or 'plan a trip' or 'watch a movie'. Since it is for read purpose so better give 'read a book' or 'read opengraph'. Click on Get Started.

Step 6: In next three tabs named 1. Edit your Action Type 2 Edit your Object Type 3 Create an Aggregation just click on save button at below move next. May change something but better opt out. At last you will finish the apps creation.
Step 7: Final step is that after finishing the apps, go to Facebook home page there you will find invitation to start the Timeline. It may not appear immediately so better to wait for few minutes. Click on Get It Now. There click on Start Tour to Tour what are in the Timeline or Just Publish Now to have immediate Timeline in your profile. Choose you Choose you Hover picture for Timeline the best one which appear in big.
And You have it. Do Put your comment below and Follow my Blog.
14 comments
Just deleted the App you have created!!!!!
I telling this to (Anonymous)
well write name it help in replying
since i didn't put the pic for 6th step so you feel little problem. Ok just make object as per verlike of read book ok. Just try out man it ok it's easy
IF you add the video here it will blast.......
and why it stop on step 6..